Spartan Games have decided to release the core v2 rules online in a free download directly from their website;
http://www.spartangames.co.uk/firestorm-armada-rulebook-download
This is a great move - for anyone that doesn't already know and play FSA but has an interest in 40K, BFG, SF, space-faring or wargames in general, get the rules now and get playing!
There's plenty of meaterial that isn't in the hardback book, so once you've tried it out there's still reason to buy the book, which is a smart and a commendable route for a games company to go down. Let's hope this move encourages others to join what is a friendly and fun community, and boost sales of their excellent miniatures.
Thank you Spartan!

Various ramblings on the modelling & gaming antics of my son and I
Wednesday 30 January 2013
Tuesday 29 January 2013
FSA Campaign - Battle Report 2
Turn two of our campaign saw my backup fleet chasing Oscars primary fleet back into Aquan space, hoping to catch it while still depleted and either recover or destroy my captured Brood. Elsewhere it was a game of cat and mouse, with fleets warily moving around the borders. My secondary (750 point) fleet was on patrol when an Aquan fleet moved into an adjacent hex, so I moved to intercept. Fortunately (for me), it turned out to be a minor (500 point) fleet.

Our fleets were as follows;
Relthoza
Brood Battleship (with Star Admiral and 1 interceptor)
Hive Carrier (6 Bombers)
Hive Carrier (6 Bombers)
3 Banes (3 Assaulters)
1 Squadron of 4 Drones
Aquans
Poseidon Battleship (Star Admiral)
Cruiser Squadron (1 Tsunami, 3 Storms)
1 Squadrons of 2 Piranhas
Setup
Green Zone with 6 obstacles - a 12" asteroid field, a planet in one corner, a distortion field, two minefields (3 & 7 mines) and a couple of deadfall salvos. Oscar chose the free short end of the table with a line of battle deployment, whereas I got a waypoint deployemnt right in the middle of the board, near the asteroids, mines and distortion field - just where I didn't want to be!
Deployment
Oscar deployed in a short line, I used the asteroid field to hide my Drones to preserve them from early fire )not easy as the mines made it single file only!) - the carriers and Brood deployed as far right and rear of their deployment area and the banes on the other side by the Drones to form a narrow pincer. Again, all ships that could cloak were deployed cloaked.
Play
Turn one was a gentle nudging forward of fleets, with Oscar's early fire defeated by stealth and cloaks. Hives, Brood and Banes moved forward, torpedoes finding no targets, except the Banes, who smashed a Piranha. The Drones carefully negotiated their way on out of the asteroid field, and flights were all disgorged - the bombers moving a modest 12" forward to avoid possible PD attacks next turn but be in strike distance.
Next turn showed the dice gods had indeed switched their allegiances. I won initiative and shot one of the bomber squadrons forward to attack the Poseidon. Playing a "Jinking" card to skip the PD, the 18AD attack critted the Poseidon despite a healthy shield reduction, and the Aquan battleship blazed inside with a raging fire. The Aquans tried to strike back with the cruisers and the battleship, and critted the Brood with an Engine failure, I played a running repairs and got it down to 1HP damage, then started applying the big hitting stick. A double crit on the Tsunami, another crit on the Battleship (decompression), more bombers attacking the Poseidon (engine failure) one Storm critted (systems offline...or no effect!). It was pretty brutal - but then I really needed to pull back something since the loss of my main fleet.
I swatted the remaining Piranha and the Aquans tried in vain to toast a Hive, putting just a single point on it.The assaulters from the Banes attempted to board the Poseidon, which I knew was suicide but I wanted them to take down the crew a bt more before I planned to board with the Banes and capture her - she was now down to 2CP and 2AP...Unfortunately that plan went bang when a crit from the Drones redused her to an expanding debris field and some escape pods...the remaining fire from my big ships vapourised the remaining ships, but not before I tried to board the same Storm twice - once from a single Bane and once from my Brood - the Storms crew earning great respect after annihilating all opposition for no loss! After a fold-space containment rupture I then vapourised this ship too, meaning I won in record time, but with little to show in terms of spoils - just 7 escape pods of fish to interrogate...
Verdict
Unlike the disaster of Aquarisum, the clash here was even more one-sided to the spiders - which was a huge relief, especially as I had a larger force - a failure would have bode very badly indeed! The Carriers really carried the day - their Bombers struck a (probably vital) early crit on the Poseidon, and I just kept pounding it, whereas the 10AD broadsides are more than capable of crushing cruisers. Banes were a slight letdown compared to the epic and valiant performance they gave last game, but they did most of what I asked of them. Brood hardly even got warmed up, which was kind of a good thing really. Anyway, the final stats were;
Aquans:
Entire fleet lost
Relthoza:
Brood: -1HP, 0AP
Hive 1: -1HP, -1 Bomber
Hive 2: -1 Bomber
Bane Squadron: One Bane 0AP, all Banes -1 Assaulter wing
Map at the end of Turn 2

Onto Turn 3!
Monday 28 January 2013
FSA Campaign - Battle Report 1
Oscar has been asking to start an FSA campaign for a while now, so at the weekend (through our collective illnesses!) we started to construct one. Using part of a star map from an old MegaTraveller boxed set, using Brian Schumacher's (DX42 for those of you who don't know) FSA Campaign rules, we crafted just that. Putting it on the PC, renaming worlds and creating bases and fleets, and we were off.

I decided to field my relthoza, and Oscar kept to his Aquan home fleets. We kicked off deploying our fleets, with written orders to introduce "fog of war", which turned out well, with a single clash in the first turn as both our 1000 point fleets met in the Aquarisum system, in which Oscar had set up a listening station and I had jumped into (meaning I wouldn't be able to use FSDs to leave the battle).

Our fleets were as follows;
Relthoza
Apex Dreadnought (6 Bombers)
Brood Battleship (with Star Admiral and 3 interceptors)
Hive Carrier (6 Bombers, 2 Interceptors)
3 Banes (3 Assaulters)
2 Squadrons of 4 Drones
Aquans
Medusa Dreadnought (Star Admiral)
Manta Battlecarrier (5 & 4 Bombers)
2 Tsunamis
3 Storms
2Squadrons of 3 Barracudas
We played with retro MARs and used Ravager's scenario generator to create the play area - we got a Blue Zone with 3 obstacles - a central asteroid field, a planet in one corner and a distortion field near the diametrically opposing one. Oscar got a flank deployment by the planet, I got line of battle, which made perfect sense for me fleet shunting in to attack the outer planet of his system. we also used my recently designed ship stat cards (which worked pretty well, we both agreed!)
Deployment
Oscar deployed in a line diagonally across the board in front of the planet, I used the asteroid field to divide my force - the carrier and Drones screened by it to perform a flanking move around it, my Dreadnought and Battleship (with their deployed wings) taking a direct line into battle against the Aquans. The Banes deployed further back than the Carrier, ready to short-shunt in where needed and (theoretically) to board damaged ships when the opportunity arose. All ships that could cloak were deployed cloaked.
Play
The first turn saw my carrier and drones skirting the asteroid field, the Banes cruising along beside them. The DN and BB plunged straight in, blasting away but poor dice rolls and good Aquan shield rolls prevented damage. Oscars ships met this force head-on, similarly blasting back and getting a point of damage on the DN - first blood to the Aquans.
Next turn was one of the busiest and dramatic I've seen in FSA, and it didn't go well for me - the early poor dice rolls were something of an omen, whereas Oscars dice gods were definately satisfied with him - I had criticals reduced to lowly single points, solid hits shrugged off and in return had lucky torpedoes snag me, Storms put damage on my DN and other similar bad luck. Aquan energy weapons and torpedoes were finding their marks all too often, despite my cloaks. Nevertheless I still got the first kill of the game with a Barracuda falling to my asteroid-skirting force.
The battle near the planet turned really nasty, and my DN was stacking points of damage, making it less and less effective. Oscar's Medusa, on the other hand, repelled my fire, my bombers (a critical again reduced to 1HP) and my torpedoes. His Manta was similarly fierce, and my BB was also soon looking very ropey. The Banes and the Carrier were having more success, and even the Drones were pulling their weight - a Tsunami was soon 4HP down and shields out, Barracudas taking hits. I switched to pulling down his mediums and smalls, taking out a Storm and damaging the others before my offensive potential was ruined.
I was then down to the desparation of boarding actions, and managed to eventually capture a Barracuda and derelict another, plus significantly reduce the Medusas crew complement - 4CP and 0AP (after failed counter-boardings on my Apex and Brood). This pulled its teeth a little, but with STAR cards it managed to summon enough power to finally destroy my Apex, and I had nothing left to board with. My Brood was down to 1CP 0AP, and was boarded by the Manta, and lost. Things went downhill rapidly thereafter, my cloaked Carrier trying to run away was cut down by the damaged Tsunamis after a containment leak, and my remaining bombers (after managing second torpedo runs) had nowhere to go. The only ship I managed to save was the captured Barracuda, which I shunted out.
Verdict
The Relthoza invasion of the Aquarisum system was an unmitigated disaster - the loss of an entire fleet is a huge blow early on in the campaign. The capture of a Brood and the Star Admiral aboard it, as well as many escape pods, will also allow the Aquans to gain vital intelligence and resources. Fortunately the Aquan fleet was mauled, and a follow-up offensive could be mounted. Final stats were;
Relthoza:
Entire fleet lost
1 Enemy Frigate captured
Aquans:
Medusa: -1HP, -4CP, 0AP
Manta: -1HP, -4 Bombers, 0AP
Storm Squadron: 1 lost, One -2HP, -2CP, 0AP, One -2HP, 0AP
Barracuda Squadron One: All lost
Barracuda Squadron Two: Two lost, one -1HP, 2CP (from Manta AP)
Tsunami Squadron: One -4HP, 0AP, one -2HP, no shields, 0AP
Relthoza Battleship with 3CP (from Aquan ship AP)
Kudos to Oscar for completely tabling me - not what I expected! I think my main mistake was rushing my big ships into the fight - I should have hung back and used my big torpedo batteries on his smaller ships - as it was, the big hitters of his fleet (Medusa and Manta) were able to go virtually unchallened as I struggled to survive - even the Storms performed really well, and I didn't have room to fight my way out - I cut my options down to early. Silly mistake, and Oscar pounced on it and cut me to ribbons! Having said that, we both acknoledged that the dice were not favouring me, and he was rolling really well - thats just how it goes sometimes...the worst was a 21-hit on a Bane...a triple critical when it was on 1 HP....there were no survivors...
Well, the Aquans carried the day at Aquarisum, but that's one battle, not the war!

Monday 21 January 2013
Watch it - 'Da Boss' has arrived!
So despite a brief plunge into winter and snow these past few days, the Post office managed to get through the weather and deliver two new ships to me today - The Syndicate Phantom-class Battleship and the Spur-class Heavy Cruiser. Here's a quick review of these two Marauder ships.
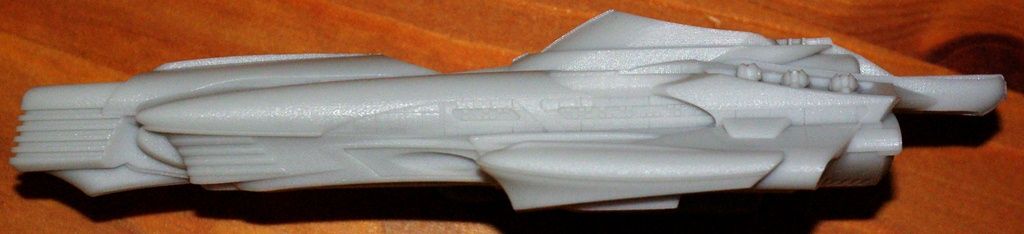
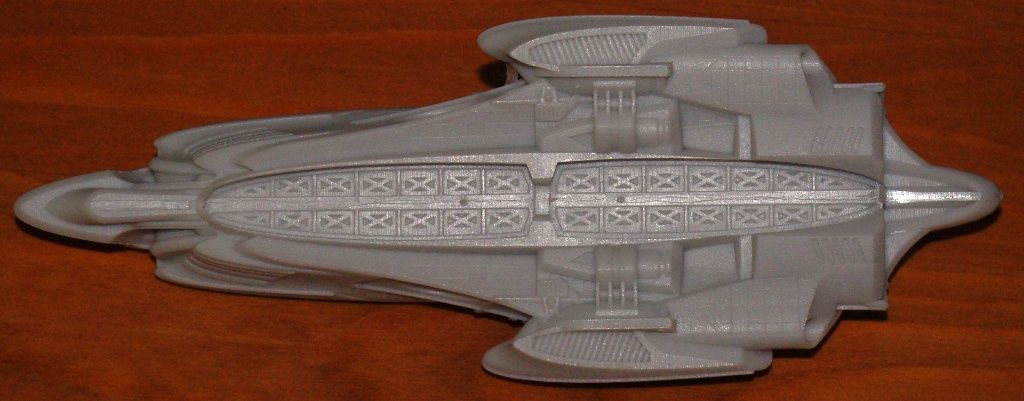
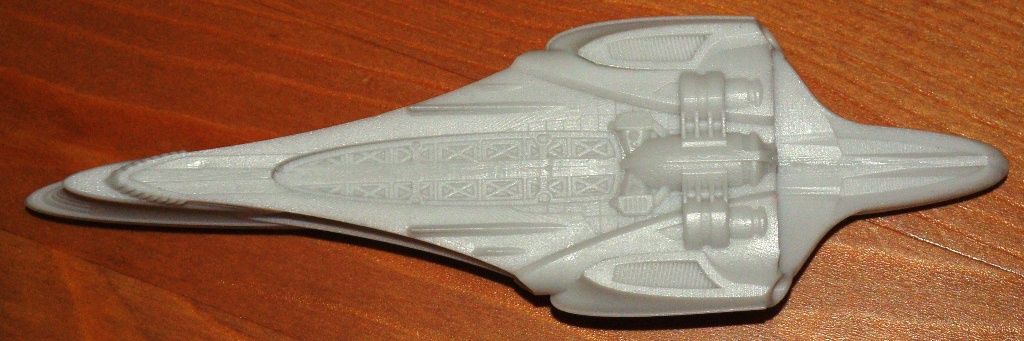
Arriving in standard Spartan Games dreadnought-size blisters, both ships are cast entirely in resin. which will please many (Spartan generally being much better with their resin castings than with their pewter work). The hull in both cases are single-piece castings and, true to most recent SG models, hold some exquisite details and fine lines.
The Phantom weighs in at 64g, placing it between the Relthoza Brood and the Terran Razorthorn, which was slightly surprising - it looks deceptively sleek.
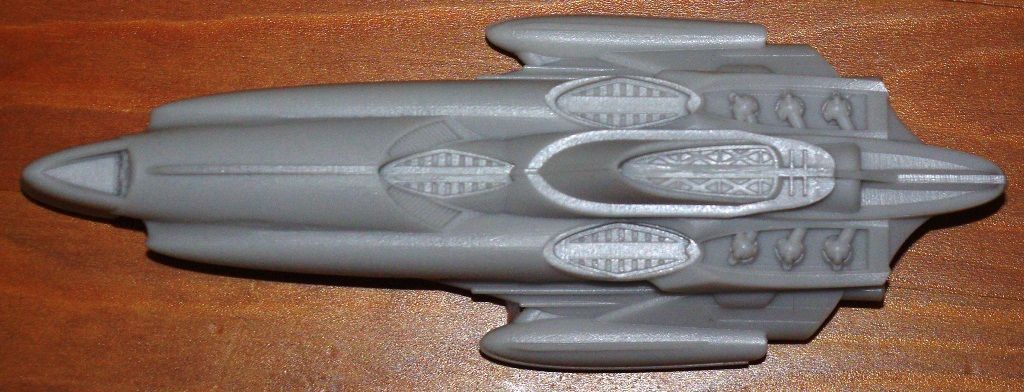
Notice the four oval-shaped areas on the top of the hull, and also two large ones underneath;
These are for the bridge, turrets and gunracks - note how they are "textured" to help adhesion - a nice touch and shows good thought about longevity of the model construction - kudos to Spartan there.
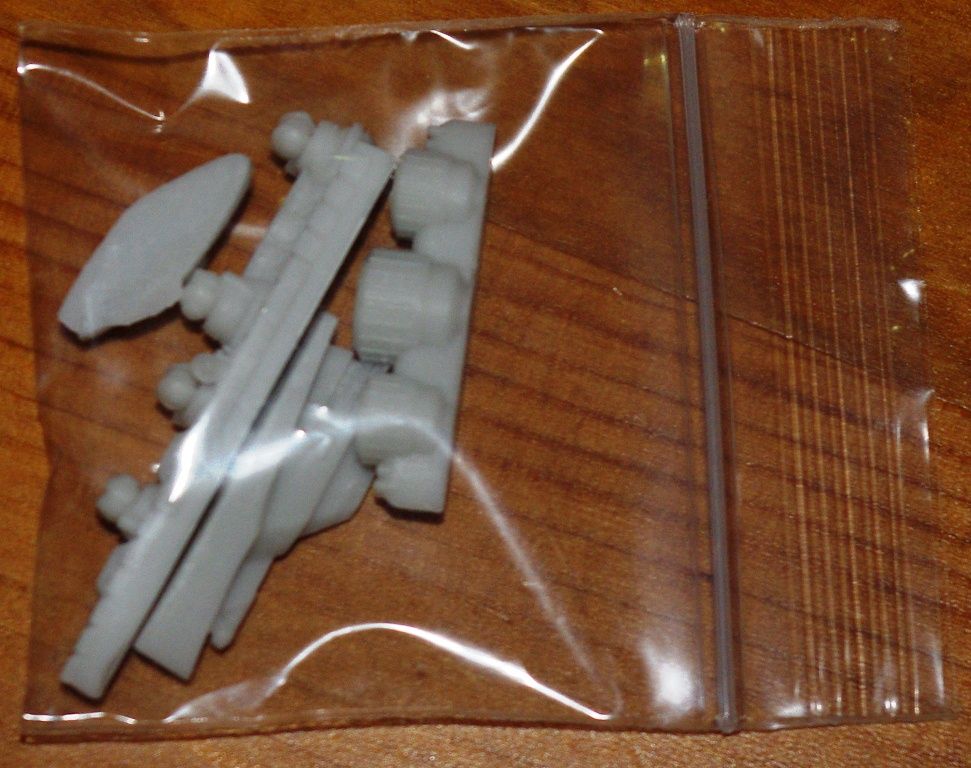
The add-ons are supplied in a small bag to stop them getting lost or broken in the blister, and consist (as I mentioned) of three turrets, two gunrack inserts, a bridge and an engine exhaust port piece.

There is a tiny amount of flash on one nacelle and the bridge insert slot, and I noticed the 3D printing lines on the top of the hull which would need light sanding to remove.
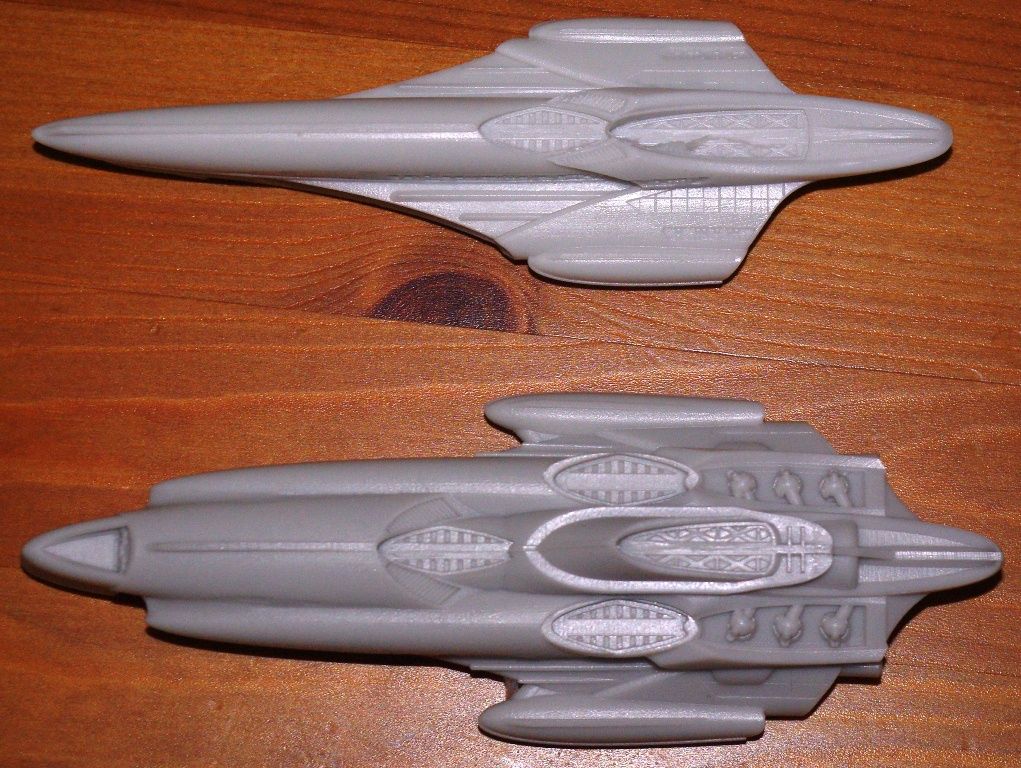
Moving on to the Spur, this weighs in at 32g, making it the largest of the Heavy Cruisers and almost the same displacement as the Dindrenzi Gladius Gunship. I think the Spur is probably the best looking ship in the FSA inventory - it's slick, looks mean and is just very "cool".


The Spur is a big ship, no mistake - here it is side-by-side with the Phantom;
Again, another little baggie with the drop-ons;
Quite excited about getting these washed, cleaned up and assembled ready for painting!
So overall I thoroughly approve of my most recent acquisitions - they are most definately Spartan at their best, and represent excellent value too. 10/10
Arriving in standard Spartan Games dreadnought-size blisters, both ships are cast entirely in resin. which will please many (Spartan generally being much better with their resin castings than with their pewter work). The hull in both cases are single-piece castings and, true to most recent SG models, hold some exquisite details and fine lines.
The Phantom weighs in at 64g, placing it between the Relthoza Brood and the Terran Razorthorn, which was slightly surprising - it looks deceptively sleek.
Notice the four oval-shaped areas on the top of the hull, and also two large ones underneath;
These are for the bridge, turrets and gunracks - note how they are "textured" to help adhesion - a nice touch and shows good thought about longevity of the model construction - kudos to Spartan there.
The add-ons are supplied in a small bag to stop them getting lost or broken in the blister, and consist (as I mentioned) of three turrets, two gunrack inserts, a bridge and an engine exhaust port piece.
Moving on to the Spur, this weighs in at 32g, making it the largest of the Heavy Cruisers and almost the same displacement as the Dindrenzi Gladius Gunship. I think the Spur is probably the best looking ship in the FSA inventory - it's slick, looks mean and is just very "cool".
The Spur is a big ship, no mistake - here it is side-by-side with the Phantom;
Again, another little baggie with the drop-ons;
Quite excited about getting these washed, cleaned up and assembled ready for painting!
So overall I thoroughly approve of my most recent acquisitions - they are most definately Spartan at their best, and represent excellent value too. 10/10
Subscribe to:
Posts (Atom)